Quick answer
AI can dramatically accelerate game-art production, but generating an attractive image is only the first step.
A reliable AI game-art workflow looks more like:
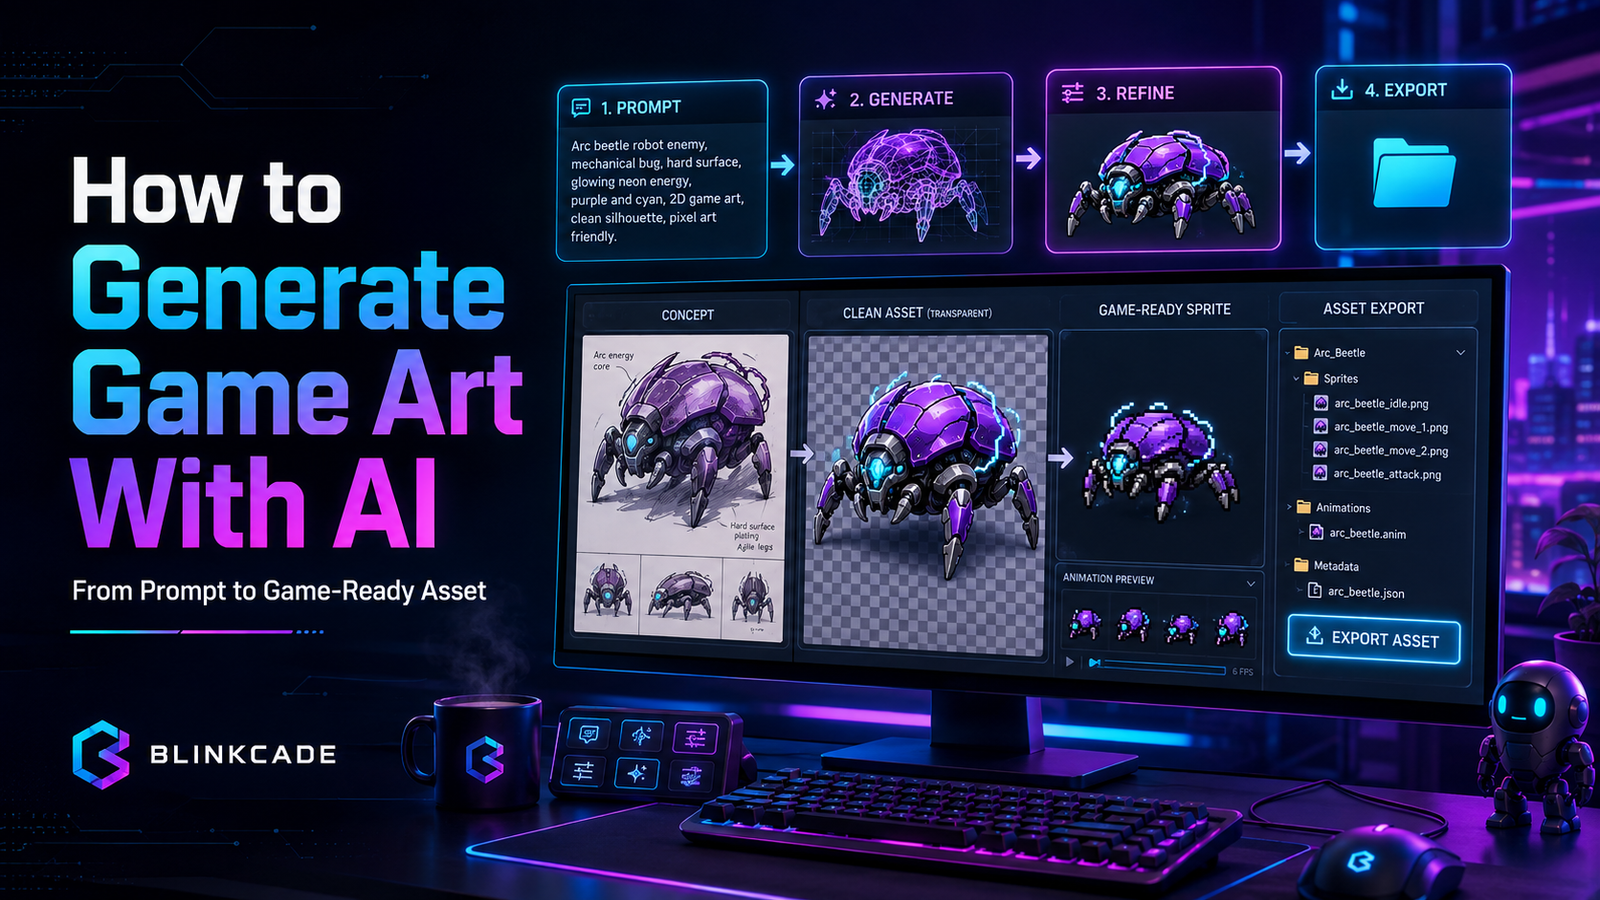
art brief → reference sheet → generation → selection → correction → background removal → consistency pass → resize → optimize → naming → engine import → in-game validation
than:
prompt → download → ship.
Modern image generators can create and edit images from natural-language instructions. ChatGPT Images, for example, supports image generation, editing existing images and requesting transparent backgrounds. Midjourney’s current editor supports selective edits, resizing, layers and background erasure, while Adobe Firefly integrates generative features into tools such as Photoshop and Illustrator.
The key difference between AI-generated art and game-ready AI art is production discipline.
This guide walks through that process.
What counts as game-ready art?
Suppose you ask an image generator:
Create a glowing robotic beetle enemy for my science-fiction game.
It produces a gorgeous image.
That image may still be useless inside the game.
Why?
It might have:
- the wrong perspective
- an inconsistent light source
- a detailed background
- soft edges that create ugly transparency
- a silhouette that disappears at gameplay size
- proportions that don’t match other enemies
- lighting inconsistent with your environment
- details that become noise at 64 pixels
- a completely different art style from the next generation
Game art has constraints that concept art does not.
A game-ready asset needs to serve a function.
Before generating anything, know:
What is this asset?
Player
Enemy
NPC
Weapon
Item
Environment prop
UI icon
Portrait
Background
Tile
Effect.
Where will players see it?
Inventory
Gameplay
Dialogue
Menu
World map.
At what approximate size?
A beautiful 2,048-pixel character may look terrible when rendered at 48 pixels.
Step 1: Write an art brief before writing a prompt
Don’t start with the generator.
Start with your game.
Let’s use a fictional Blinkcade game called Neon Salvager.
We need an enemy called the:
Arc Beetle
Instead of immediately prompting:
cool cyberpunk bug
we define:
ASSET
Arc Beetle

ROLE
Small common enemy

GAME VIEW
2D side view

GAMEPLAY SIZE
Approximately 96 × 64 pixels

VISUAL ROLE
Must be immediately recognizable as hostile.

SHAPE LANGUAGE
Low body, six mechanical legs, large glowing front mandibles.

PALETTE
Dark graphite body.
Electric cyan energy.
Small magenta warning lights.

LIGHTING
Soft cool rim light from upper left.

STYLE
Stylized 2D game illustration.
Clean shapes.
Moderate detail.
Strong readable silhouette.
Not photorealistic.

BACKGROUND
Transparent.

AVOID
Text.
Logos.
Human features.
Tiny antenna details.
Heavy motion blur.
Complex shadows extending far from body.
That is much more useful than an aesthetic adjective pile.
It describes what the asset must do.
Step 2: Establish visual rules for the entire game
The biggest AI-art problem is rarely generating one good image.
It’s generating image number 37 that looks as though it belongs beside image number 1.
Create a project-wide art specification.
For example:
NEON SALVAGER — ART RULES

Camera:
2D side-on presentation

Shape:
Chunky readable silhouettes
Limited tiny surface detail

Palette:
Graphite
Cyan
Magenta
Occasional warning yellow

Lighting:
Cool upper-left rim
Dark lower-right shadow

Materials:
Painted metal
Ceramic
Glowing energy glass

Outline:
Subtle dark edge separation

Background:
Transparent for gameplay entities

Scale:
Common enemies approximately 64–128 px tall

Do not use:
Photorealism
Anime proportions
Painterly brush texture
Text labels
Real-world logos
Lens blur
Now every generation starts from the same visual grammar.
Save it.
Don’t reinvent your art direction every prompt.
Step 3: Generate a reference asset before generating a library
Do not generate 100 assets immediately.
Make one representative asset.
For Neon Salvager, the Arc Beetle is a useful test because it contains:
mechanical materials
glowing elements
a gameplay silhouette
transparency requirements.
An initial prompt might be:
Create a 2D side-view enemy for a stylized science-fiction game.

Subject:
A compact six-legged robotic beetle called an Arc Beetle.

Design:
Dark graphite mechanical shell.
Large forward-facing energy mandibles glowing electric cyan.
Two small magenta status lights.
Chunky readable legs.
Low aggressive silhouette.

Style:
Polished stylized game art.
Clean controlled shapes.
Moderate detail.
Strong silhouette that remains readable at small gameplay sizes.
Consistent cool rim lighting from upper left.

Composition:
Full creature visible.
Perfect side view.
Centered.
No cropping.

Background:
Transparent.

Do not include:
Text, logos, scenery, floor, complex cast shadows, human features or extra limbs.
Then evaluate the result against the brief, not against whether it looks impressive.
Ask:
Is the silhouette readable?
Is the perspective correct?
Does it look hostile?
Can the legs be understood at small size?
Are there exactly six legs?
Does the transparency look clean?
Would ten enemies generated this way look related?
Only proceed when the answer is mostly yes.
Step 4: Iterate by editing, not constantly starting again
This is an important production habit.
Suppose the image is almost right but the mandibles are too small.
Don’t necessarily regenerate the entire character.
Ask for a targeted edit:
Keep the character design, pose, palette, lighting and proportions unchanged.

Change only the front mandibles.

Make them approximately 30% larger and give the cyan energy surface a clearer silhouette.

Do not alter the legs, body shell, camera angle or background.
The principle matters regardless of which generator you use:
Once an asset is close, reduce the number of things allowed to change.
Otherwise every correction becomes a new redesign.
Step 5: Separate concept generation from production assets
AI is exceptionally good at rapid concept exploration.
For example, generate:
12 Arc Beetle concepts
with different:
shells
mandibles
leg shapes
energy cores.
Then choose one design.
That chosen design becomes the reference.
Now production prompts should say, conceptually:
Preserve this approved design.
This is much safer than allowing the AI to keep creatively reinventing your enemy every time you request a new pose.
Think of the pipeline as:
exploration mode
Many ideas.
↓
selection
One design.
↓
production mode
Consistency matters more than creativity.
This distinction can save enormous amounts of cleanup.
Step 6: Inspect transparency manually
A generator saying “transparent background” doesn’t mean the asset is automatically ready.
Zoom in.
Look around:
legs
hair
weapons
energy effects
thin antennas
shadows.
Common problems include:
- gray halos
- semitransparent background remnants
- checkerboard patterns accidentally rendered into the image
- missing thin details
- unnatural cut edges
- floating shadow fragments
If necessary, remove the background in a dedicated editing tool after generation.
For gameplay sprites, clean alpha edges matter considerably more than they do in a large concept image.
Step 7: Test the asset at actual gameplay size
This is the step people skip.
Your 1,536-pixel enemy looks fantastic.
Then it enters the game at:
96 pixels wide.
Suddenly:
the face disappears
the leg details turn into noise
cyan lights merge together
the weapon can’t be identified.
Always preview assets near their final scale.
For example:
SOURCE
1536 × 1024

GAME EXPORT
192 × 128

EXPECTED DISPLAY
96 × 64
View the asset at all three sizes.
At 96 × 64, ask:
Can I understand its direction?
Can I identify the dangerous part?
Does it separate from the background?
Can I distinguish it from another enemy?
If not, the answer may not be higher resolution.
It may be simpler art.
Step 8: Build the game asset, not just the image
Let’s turn our Arc Beetle into an actual asset record.
A production folder might contain:
assets/
  enemies/
    arc-beetle/
      source/
        arc-beetle-master.png

      game/
        arc-beetle-192.png
        arc-beetle-96.png

      references/
        arc-beetle-style-reference.png

      metadata.json
Metadata might be:
{
  "id": "enemy_arc_beetle",
  "type": "enemy",
  "view": "side",
  "sourceSize": [1536, 1024],
  "gameSize": [192, 128],
  "displaySize": [96, 64],
  "background": "transparent",
  "status": "approved",
  "version": 3
}
Why bother?
Because eventually you’re not managing five images.
You’re managing hundreds.
Asset discipline becomes increasingly valuable as AI makes generating those hundreds easier.
Step 9: Optimize files before shipping
Do not automatically ship the giant source image.
Keep:
master/source asset
and:
runtime asset
separate.
The runtime version should be sized for its actual job.
For browser games especially, asset weight affects:
initial load
mobile performance
bandwidth
memory.
Use the appropriate format.
Common possibilities include:
PNG
Useful when transparency and lossless pixel information matter.
WebP
Often useful for substantially smaller web-game image assets while retaining transparency.
JPEG
Useful for opaque photographic/background imagery where transparency isn’t required.
Your engine and target platform should determine the final decision.
The AI generator is not your asset optimizer.
Step 10: Import the asset and inspect it in the actual game
An asset is not approved because it looks good in an image viewer.
Put it into the game.
Test it against:
real background
real camera
real UI
real enemies
real movement.
Perhaps the Arc Beetle has cyan energy.
But your level is already filled with cyan lights.
The enemy disappears.
The generated art isn’t technically wrong.
The game-design context reveals the problem.
You might revise:
cyan → warning orange
or add:
a darker outline.
This is why game-ready validation must happen inside the game.
Step 11: Generate families, not isolated images
Once the Arc Beetle is approved, create related enemies from the same visual foundation.
For example:
Arc Beetle
small melee enemy.
Arc Spitter
same shell family, ranged energy organ.
Arc Guardian
larger armored variant.
Arc Queen
boss interpretation.
The prompt should emphasize inheritance:
Create a larger armored variant of the approved Arc Beetle.

Preserve:
- mechanical design language
- graphite shell material
- cyan energy technology
- magenta status lights
- side-view camera
- lighting direction
- rendering style

Change:
- approximately twice the visual mass
- heavier armor
- larger front energy shield
- broader leg stance

The result must clearly belong to the same enemy family.
This builds visual systems, not image collections.
That’s what a game needs.
Step 12: Maintain an asset registry
AI can create assets faster than humans can remember why they exist.
Maintain a simple registry:
| Asset | Status | Source | Game Export | Approved |
|---|---|---|---|---|
| Arc Beetle | Final | v3 master | 192×128 | Yes |
| Arc Spitter | Review | v2 | — | No |
| Arc Guardian | Concept | v1 | — | No |
Also record:
- prompt/reference
- generation tool
- generation date
- edits made
- model/version if available
- license/terms snapshot or relevant provenance
- human modifications
This becomes especially important for commercial production.
What tools can you use?
There is no single mandatory AI-art tool.
Different systems have different strengths.
ChatGPT Images
ChatGPT Images can create new images, edit existing ones, follow detailed modification instructions and generate transparent backgrounds.
That makes it particularly useful for iterative workflows where you’re discussing both the asset’s gameplay requirements and the image itself.
Midjourney
Midjourney’s editor supports selective editing, image resizing, layers and transparent-background workflows.
It’s useful when visual exploration and stylization are a major part of the workflow.
Adobe Firefly
Firefly generative capabilities are integrated across Adobe applications including Photoshop and Illustrator.
That integration can be useful when AI generation needs to flow directly into a traditional Photoshop/Illustrator production process.
The important point is:
Choose the workflow—not the hype.
The best tool is the one that produces assets you can reliably turn into consistent game content.
Commercial-use and copyright questions still matter
Do not assume:
AI generated it, therefore I automatically own every possible right to it.
Terms vary by tool and jurisdiction.
Platform rules can also change.
For commercial games:
- review the generator’s current terms
- document which tool created each asset
- avoid deliberately requesting copyrighted characters or branded material
- keep original prompts and source files
- record substantial human edits
- review platform-specific AI disclosure requirements
Treat provenance as part of the asset pipeline.
The game-art prompt template
A reusable prompt could look like this:
ASSET TYPE
Enemy / player / weapon / prop / icon / environment.

GAMEPLAY PURPOSE
What the asset communicates to the player.

CAMERA
Side / top-down / isometric / portrait.

DISPLAY SIZE
Approximate in-game dimensions.

SUBJECT
Physical description.

SILHOUETTE
The major shapes that must remain readable.

MATERIALS
Metal / cloth / stone / energy / organic.

PALETTE
Primary, secondary and accent colors.

LIGHTING
Direction and intensity.

STYLE
Rendering rules.

CONSISTENCY
Reference the approved game's art direction.

COMPOSITION
Centered / full object / no crop.

BACKGROUND
Transparent or specified environment.

AVOID
Text, logos, visual noise, unwanted perspective,
extra limbs, complex shadows, etc.
The format is intentionally practical.
You’re specifying an asset contract.
The complete AI game-art workflow
When Blinkcade uses AI art for production, the pipeline should be:
1. Define
What does the asset need to do?
2. Specify
Camera, size, silhouette, palette and style.
3. Explore
Generate several directions.
4. Select
Choose one canonical design.
5. Lock style
Turn the selected design into a reference.
6. Edit
Correct specific defects without unnecessarily redesigning everything.
7. Clean
Transparency, edges, anatomy, geometry.
8. Resize
Generate runtime dimensions.
9. Optimize
Use appropriate runtime formats/compression.
10. Register
Asset ID, source, version and provenance.
11. Import
Put it into the actual game.
12. Validate
Check readability, performance and consistency during gameplay.
13. Approve
Only then call it game-ready.
Blinkcade verdict
AI image generation can reduce the cost of exploring and producing game art enormously.
But the biggest mistake is treating generation as the entire art pipeline.
A strong AI game-art workflow doesn’t ask:
Can the AI make a cool picture?
It asks:
Can we repeatedly create assets that obey the same visual system, remain readable during gameplay, import cleanly, perform well and survive commercial production?
For our Arc Beetle example, the process is not:
prompt → enemy.
It is:
brief → art rules → concept → select → refine → transparent master → runtime export → game test → revision → approval.
That extra discipline is what turns generative AI from a concept-art novelty into a usable game-production tool.
The more powerful image generation becomes, the more important that production discipline becomes too.
Sources & verification
- OpenAI — ChatGPT Images: https://help.openai.com/en/articles/11084440-im
- Midjourney — Editor documentation: https://docs.midjourney.com/hc/en-us/articles/32764383466893-Editor
- Adobe — Firefly generative AI approach: https://www.adobe.com/ai/overview/firefly/gen-ai-approach.html
Last verified: September 2, 2026
Blinkcade original contribution: a complete game-production asset pipeline, Arc Beetle example specification, game-readiness criteria, prompt contract, asset registry model, runtime sizing workflow and in-engine validation process.